Saturday, November 16, 2013

Make A Buttercream Transfer

Make A Buttercream Transfer

What do you love about Halloween?

One of the traditions I love is watching the Peanuts holiday special,
"It's the Great Pumpkin, Charlie Brown".
I remember when I was a kid, looking forward to the one night it was broadcast each year.
If you weren't parked in front of the TV that one night, you missed it.

Now I watch the DVD with my kids whenever we want!
I love the story, I love the music and I love Linus!
How could you not adore a kid with such passion and commitment?

So, here is my ode to this classic Halloween story.
I made a buttercream transfer of Linus in the pumpkin patch.
Want to learn how to make one too?

 
First, decide what image you want to create. You can find it online and print it, or coloring pages are great templates. Use a photo editing program to "flip" your image before you print it (you want to make a reverse image) and size it for your cake. Tape your template to a piece of cardboard and tape wax paper on top of it.


Next comes your outline. To make black frosting, start with chocolate fudge frosting and add a little black food coloring gel. If you start with white frosting you will need LOTS of black gel...and eating it will give you black teeth! I used a Wilton #3 tip to pipe the outline. If you make a mistake, use a toothpick to remove that part. Notice how I didn't exactly follow the template and added a pumpkin? If your template isn't just what you want, you can just use it as a guide and improvise.


Now you get to color inside the lines! Make a batch of buttercream frosting, then divide up small amounts and add food coloring gel. Starting at the top of your transfer, pipe in your colors one at a time. Be sure to fill in all the empty spaces. For really tiny spaces, use a Wilton #1 tip.


When you are finished, put your buttercream transfer in the freezer. Then assemble and frost your cake. When the cake is ready, get out your transfer. Flip it over and place it gently on the cake. Next, put the whole cake in the freezer! Wait at least 30 minutes, then  take it out and slowly peel the wax paper off your transfer.


Enjoy!

Christmas Cupcake Carrier

Christmas Cupcake Carrier

I found this fabulous idea on Pinterest, and I just had to share it with you!
It is a cupcake carrier made out of a gift box...perfect for delivering my Christmas goodies.
I made a cupcake version of my Andes Mint Chocolate Cake.

First, get some boxes. I found a package of three small gift boxes for $1 at Dollar Tree! 
On the top of your box, measure a 2 1/4 inch square for each cupcake and mark the corners with a pencil. 

Use an Xacto knife to cut an X from corner to corner, and bend down each point. 
Decorate or write a message on your box.

Place your cupcakes in the carrier, and you are ready to deliver!
Hope you are having fun making lots of Christmas treats this week. :0)

 And speaking of Pinterest, don't you just love it?!
I added a button in the right column, so you can follow me there.
Go click on it!
car accident lawyer accident lawyer car accident lawyers auto accident lawyer truck accident lawyer car accidents lawyers accident injury lawyer accident injury lawyers automobile accident lawyer lawyer car accident traffic accident lawyer austin dwi lawyer dwi lawyer dallas dwi lawyer houston dallas dwi lawyer houston dwi lawyer injury lawyer injury lawyers work injury lawyer personal injury lawyer san diego personal injury attorney personal injury attorneys personal injury phoenix dui lawyer dui lawyer dui lawyers atlanta dui lawyer health insurance abroad health science degree expatriate health insurance electronic health records electronic health record health

Conversation Heart Cupcake Toppers

Conversation Heart Cupcake Toppers

Here is a Valentine's Day tutorial that I shared over at The 36th Avenue.
Do you follow Desirée's blog?
If not, you are missing out...it is fabulous!


Come make some Conversation Heart Cupcake Toppers with me!


You will need:
heart cookie cutter
wax paper
candy melts
red gel food coloring
a batch of cupcakes
frosting (you can buy it or use this buttercream recipe)

First, make a template by tracing your cookie cutter on a piece of paper.
Tape your template to a piece of cardboard or the back of a cookie sheet.
Tape a piece of wax paper over the template.

Next, put your candy melts in a bowl and microwave:
Cook for 30 seconds, stir, and repeat until they are completely melted.
(My green and purple candy melts were both darker than I wanted,
so I mixed them each with white candy melts to lighten the color.)
Put each color in a separate decorating bag, or in a ziploc with the corner snipped off.


Filling in the outline, pipe the candy melts on to your wax paper.
Put the hearts in the fridge for a few minutes to set up.

When the hearts have hardened, carefully peel them off the wax paper.
Tint a small amount of frosting red and put it in a decorating bag,
or you can just use a tube of red gel food coloring.
Write messages on the flat side of your hearts...
you can personalize them any way you like!


Frost your cupcakes and place a heart on top of each one.
Share the love and give them to your sweethearts!


Enjoy!

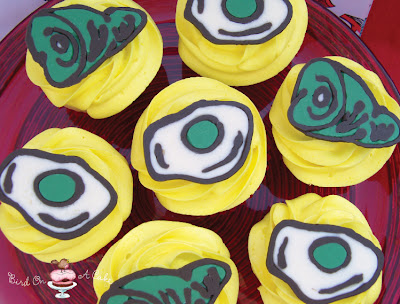
Green Eggs and Ham Cupcakes

Green Eggs and Ham Cupcakes

We have a lot of love for Mr. Theodor Geisel in this family.
He is better known as the incomparable author, Dr. Seuss.


Our Dr. Seuss books are all well-loved and very well-worn.
I'm pretty sure that we own every children's story he ever wrote,
including "The Bippolo Seed". Have you heard of that one?

We even dressed as Dr. Seuss characters for Halloween 2010!


 I would say that "Green Eggs and Ham" is probably our favorite Seuss book.
My son has the whole book memorized and will quote from it at random times.
When we go out at night, he starts reciting, "Would you, could you, in the dark?"
and continues with the rest of the book!

We celebrate lots of extra birthdays around here, including Cookie Monster and Beethoven.
So, I made these cupcakes to celebrate Dr. Seuss' birthday on March 2.


Do you like green eggs and ham?
Would you, could you, like to make them?

You can print out my template for green eggs and ham cupcake toppers here.


For my tutorial on making candy melt decorations with a template, go here.
To make the thick, dark outline, I used Wilton tip #5 and
brown candy melts mixed with some black coloring gel.


I hope you enjoy these fun cupcakes!
Happy Birthday, Dr. Seuss!